Your Cart

Restoring An Exterior Wood Sign


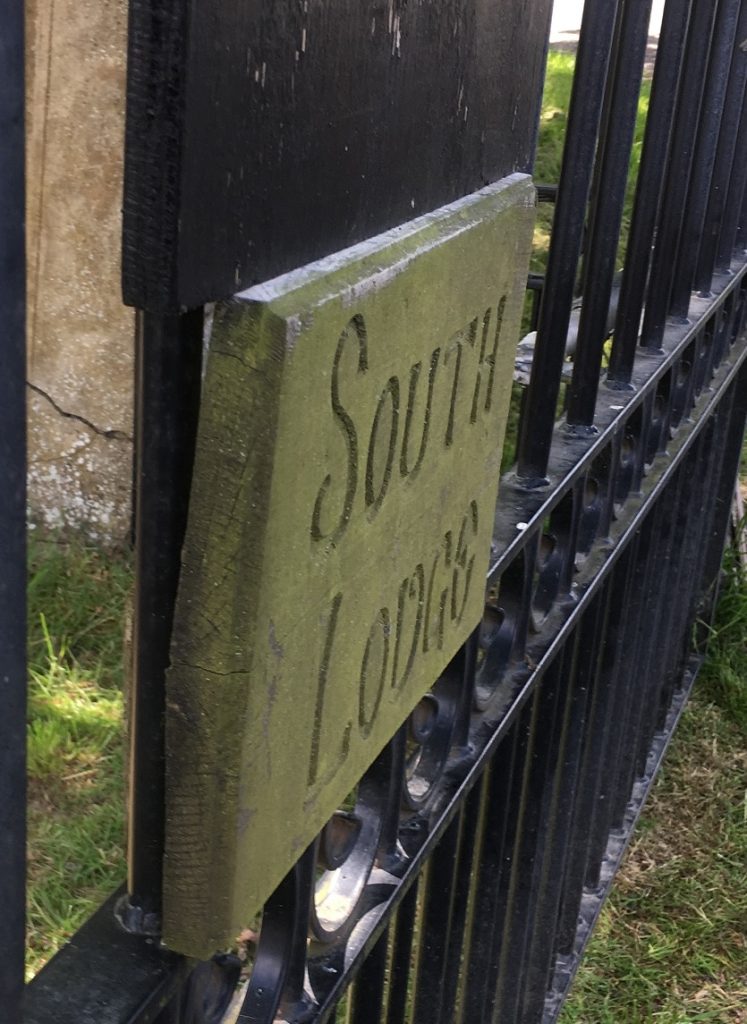
Our beautiful hand made exterior wood sign for South Lodge had aged badly over the last 6 years. It now needed restoring before failing completely. We restored it to a better than new state in this article. It will now need little maintenance and looks fabulous. Michelle made this beautiful hand made wooden sign from old slow growth pine floor boards for our house. That was 6 years ago, and the sign has been on the gates in our damp environment bare since then.

The Aged Exterior Wood Sign

exterior wood sign restoration start front

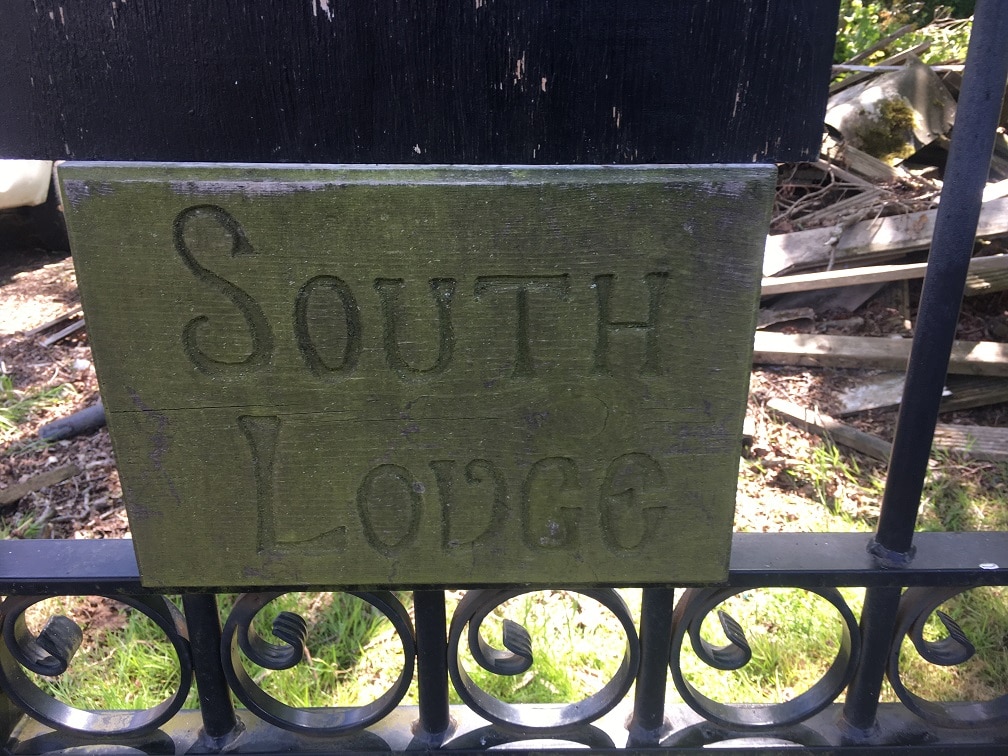
Our exterior wood sign had aged badly in our damp environment. Discoloured with algae, warped and cracked it had clearly suffered from the damp, despite being decent old slow growth timber.

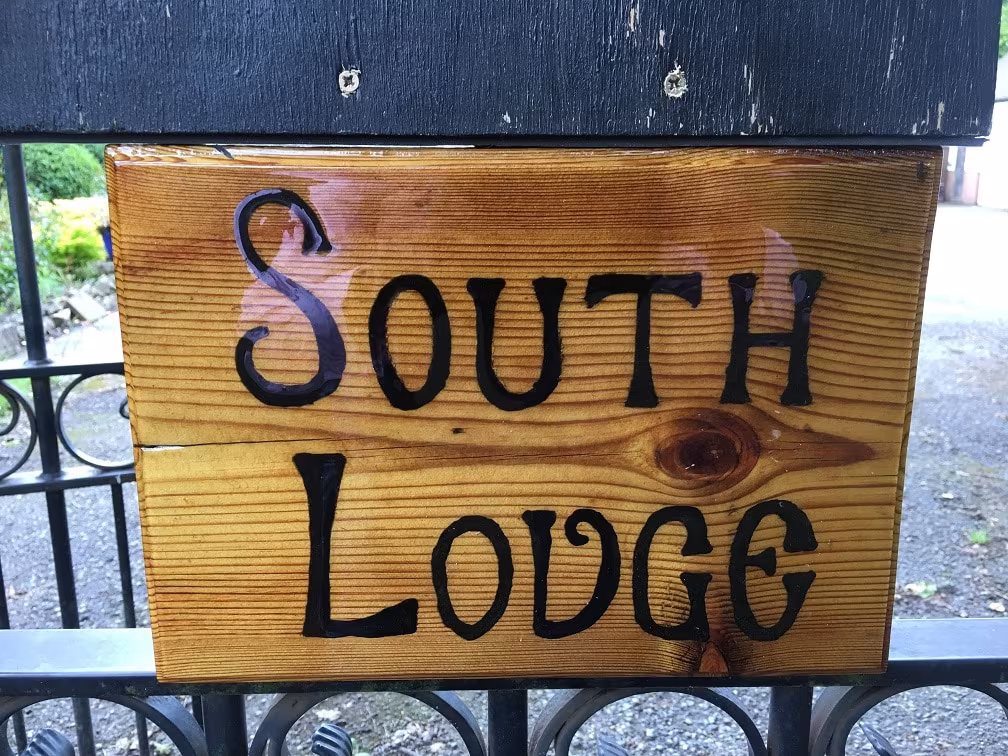
And this is what we are going to turn it into.

It’s a finish fit for any boat, door or window frame and it will last like no varnish finish you have ever had has lasted before.

It will need maintenance, but just extra coats – not the endless starting again with sandpaper.


exterior wood sign restoration start end grain

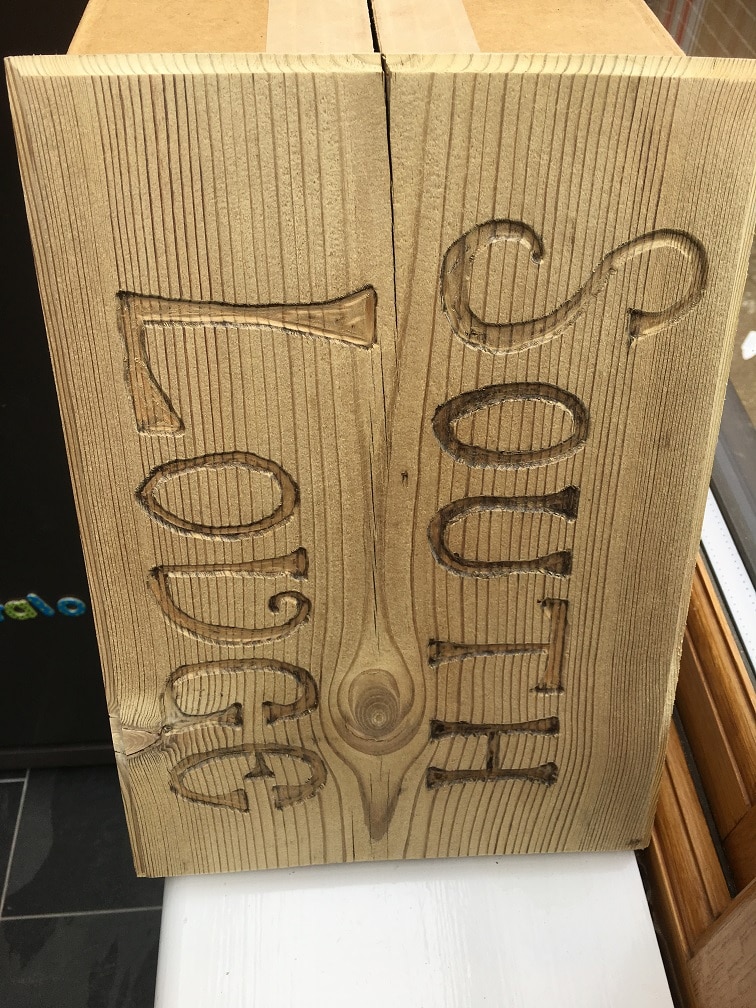
Once this piece of pine was flat. The crack probably wasn’t there when Michelle routed and carved our beautiful hand made exterior wood sign either.

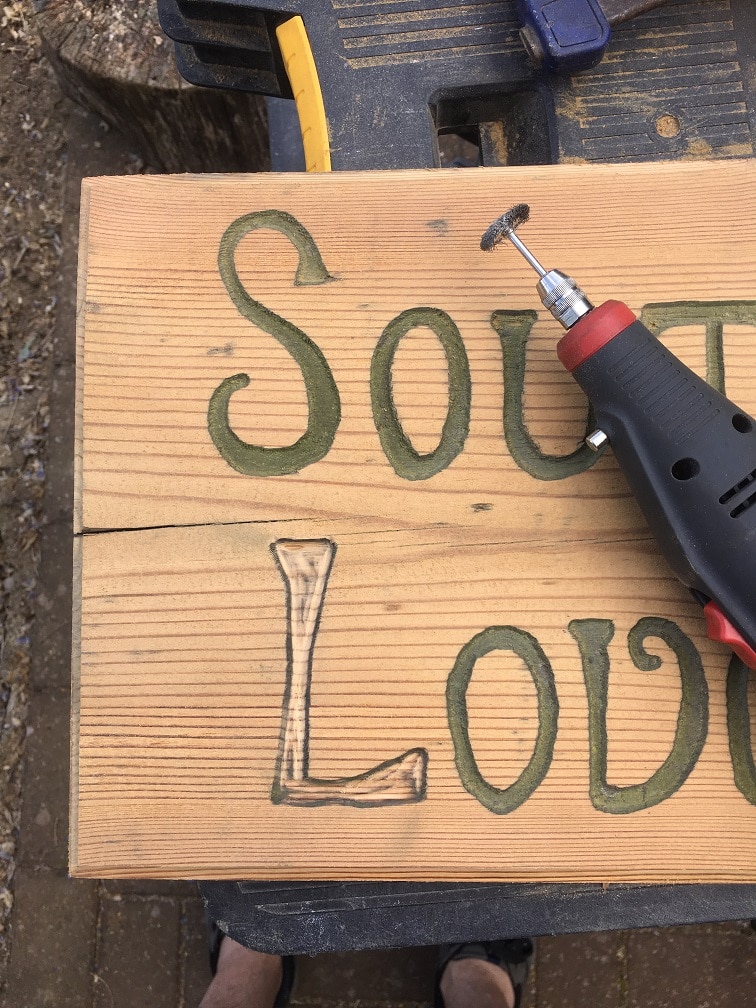
Let’s get the sign down and do what we can for restoration. We clearly need protection from weather, and I am keen to make the lettering stand out a bit more too.

Refinishing Our House Sign To Make It Look Great

exterior wood sign restoration refinishing edges

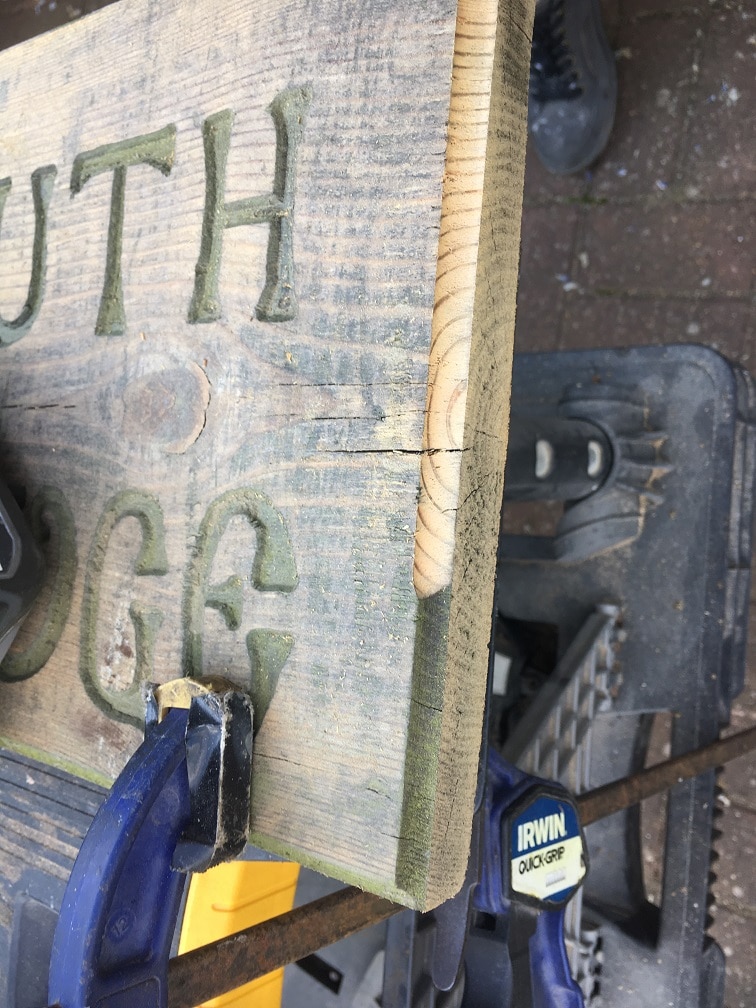
First we sanded the sign with a random orbital sander and 120 grit paper. The discolouration went deeper than that. Refinishing needs more effort than I was prepared to do by hand on the edges.

We rerouted the edge using the correct profile bit (a cove ) in a Ryobi palm router (also known as laminate trimmers sometimes). Simple; nice clean edges and the original look and feel of the hand made exterior wood sign restored.

exterior wood sign restoration refinishing face and letters

As the discolouration of the faces was rather deep, we used the random orbital sander from 40 grit down to 400 grit. This left the faces pretty nice, with odd patches of discolouration where damage to the timber had allowed deeper discolouration.

We used a small hand held rotary tool with a rotary wire brush to clean out the hand carved lettering that made our external wood sign say something useful.

exterior wood sign restoration bleached wood to remove algae

Finally we addressed the last few bits of discolouration on our external wood sign, as far as possible, by a three hour bath in a gallon of water which had a mug of bleach added to it. We submerged the sign in the bleach bath, and then dried it in the conservatory over four days.

The finish was probably as good as when new now. So – How do we keep it this good when we put our sign back outside, and how do we make the letters more readable?

Protecting our exterior wood sign from weather and UV light

Clear Penetrating Epoxy Sealer (CPES)

Clear Penetrating Epoxy Sealer will make the wood resistant to the moisture present in our environment. CPES sticks varnish down to the wood. The varnish will provide UV protection for the timber and the CPES. This is the trick to make varnish last on all exterior wood. It is much used in the wooden boat community. Frankly I would not ever varnish anything without priming with CPES first.

Preparation and Planning

use a  tray to soak clear penetrating epoxy resin

I lined an old biscuit tin with plastic to make a bath to immerse the end grain of the sign into during treatment. This tin did not have soldered edges, if it did though it would have been liquid tight without lining.

exterior wood sign restoration tray to soak clear penetrating epoxy resin end grain in

We can immerse the whole end grain of the sign with only a few hundred ml of CPES. The tin now makes a handy drip and recollection tray whilst painting the faces and edges of the exterior wooden sign.

Applying CPES to the bare exterior timber to protect it

mix cpes clear penetrating epoxy resin

I used a small bottle of 120ml capacity to measure identical amounts of part A and Part B CPES into the lined biscuit tin. We stirred the Clear Penetrating Epoxy Sealer with the disposable brush to mix the it in the tin.

exterior wood sign restoration apply clear penetrating epoxy resin cpes

With the exterior wood end grain immersed in the bath of CPES, the chip brush is used to paint the faces and edges of the sign.

The sign was left immersed into the bath for fifteen minutes on one end and the faces were painted.

This was repeated on the other end grain, and the faces repainted again.

I repeated that process one more full time (half an hour of immersion on the end grain, and four coats at 15 minute intervals on the faces and edges) .

Notice how well the Clear Penetrating Epoxy Sealer has bought out the grain.

exterior wood sign restoration dry first coat of clear penetrating epoxy resin

The exterior wooden sign is then removed and hung up to dry.

A second coat will be done later when the majority of the solvents have evaporated. We determine solvent evaporation by smelling the end grain area.

store unused clear penetrating epoxy resin

We removed unused CPES from the bath and put it back into a closed bottle and stored in a cold dark place. This slows down the setting of the CPES. The CPES should still be usable to apply our second coat once the solvents have evaporated from our exterior wooden sign.

Colouring the letters on our exterior wooden sign

exterior wood sign restoration coated with cpes clear penetrating epoxy resin

Two coats applied and dried to the touch (overnight) as before, the sign is starting to look nice now.

The warped sign made us fill the words on the sign one at a time. I set the word ‘Lodge’ level on a flat surface, and clamped it down. Clamps held it down onto plastic spacers that levelled it on my work surface.

I score Irwin Quick Grip clamps very highly indeed by the way, as they are fast simple and very reliable.

Use scales to weigh epoxy resin to colour the letters on the sign

To ensure accurate mixes I use kitchen scales to weigh the two components of the Smiths Layup and Laminating epoxy that I used.

I could have used any epoxy resin with a set time of a half hour or greater here instead of layup and laminating.

We decided on black lettering for a classical look, and added a small amount from one of our epoxy colouring kits.

I mixed 22 grams of epoxy for each word on our sign. This was more than enough, but means that the colouring is very consistent.

exterior wood sign fill letters with coloured epoxy resin

I used a disposable pipette to carefully fill the letters to level. The resin is liquid so it will flow and settle.

Once the resin has settled the levels can be adjusted by adding or removing resin with the pipette.

If you don’t have a steady hand then I suggest you find someone who does here. It is an awful job clearing epoxy resin off if you spill any, particularly if you don’t have clean up solvent to hand.

exterior wood signage burst bubbles in epoxy resin with heat

Use a blowtorch or a lighter to burst any bubbles that rise to the surface of the resin. The localised heating will also thin the resin and assist it to flow and level faster. I used this lighter for about 4 seconds per letter to burst the bubbles here.

It’s starting to look pretty now

exterior wood sign ready for topcoats and uv protection

The nearly finished wood sign is now ready to have some UV protection applied to it. It already looks far better than it did when it was new, let alone a week ago when the restoration started.

Giving UV protection to our exterior wooden sign

exterior wooden housename has cpes flattened with wire wool prior to varnishing

Firstly I flattened the CPES with some fine wire wool. CPES is very much easier to use to fill grain, and prime timber with than thinned varnish. Furthermore it sands far easier too. It’s deep penetration enhances the natural grain of the timber whilst priming it perfectly.

That it also makes your varnish finish last many times longer is really the cherry on the top. This is a trick much used by the wooden boat fraternity.

The sign is then washed and dried to remove sanding residues before we proceed any further.

Exterior wooden sign apply light coat of clear penetrating epoxy sealer to make top coat stick

Before applying top coats we now apply a final thin coat of Smiths Clear penetrating Epoxy Sealer (CPES) to the exterior wood sign.

This will make our top coats stick as chemical bonds will form between the top coat and the still curing CPES. I will apply the top coats tomorrow.

I applied the CPES with a rag to save wasting a brush. We only want a thin film as the wood is already saturated with CPES.

Exterior sign primed with CPES prior to adding top coats

Then I hung the exterior wooden sign up to dry for a few hours. The applied film was thin enough that it was solvent smell free then.

Giving UV protection to our exterior wooden sign

back face of wood sign top coated with sadolin microporous

We applied a single coat of Sadolin Superdec paint which is microporous to the back of the exterior wood sign, and let it dry overnight.

Microporous paints work very well indeed over Clear Penetrating Epoxy Sealer, as it is also microporous.

wooden sign coating with Epifanes clear High UV varnish

I apply the first of 5 coats of Epifanes High UV gloss varnish by brush.

Wrapping the brush in cling film was a mistake, as the Epifanes was hardening and the brush required significant cleaning. The brush was cleaned in white spirits after every application following this discovery.

I sand the Epifanes after every coat has dried (24 hours) to ensure that the coats adhere perfectly together. Use 400 grit sandpaper or finer. Alternatively fine wire wool can be used.


The finished sign. Magnificently flat and shiny with 5 coats of Epifanes on the CPES primer.

I apply another coat of black microporous paint to the back of the sign and it is deemed fit for purpose.

The finished sign is mounted on our gates once more. The finish is quite magnificent – shiny flat surface with wonderful grain.

This is June 2019. I decide I don’t like the blackboard on top of the sign – so that will get moved.

UV resistant weatherproofed exterior wood sign.

Future maintenance of the sign will be logged here, as will the ageing of the finish. A photographic library will develop.

exterior wood sign weatherproofed and varnished end grain

The end grain of the sign looks pretty fabulous and weatherproof as well. This was Spring 2019 when this sign was initilly restored.

Ageing and Maintenance of Exterior Varnish

varnished wood after 18 months exposure to the UK


I had some varnishing to do in December 2020, so the decision was made to give the sign a maintenance coat then. After 18 months attached to the gates the sign was brought in for a maintenance coat. Here it had been cleaned and looked about perfect.

exterior varnish after 18 months sanded and applying a maintenance coat.

The varnish was roughened with a light rub with wire wool, and now appears matt. This will ensure the next coats of varnish adhere properly to the old varnish. Here the first coat of Epifanes ‘Wood Finish’ is being applied.

exterior varnish maintained and refitted

The sign has now been reinstalled after 2 coats of Epifanes wood finish varnish. Would more people varnish things if they knew that the varnish could be made to last?


Varnished exterior wood after 4 years

It is now October 2022. The sign has outlasted my gates, which are being replaced.
The finish on the sign is still so good that I am not even going to put any maintenance coats of varnish on to the sign at this time.